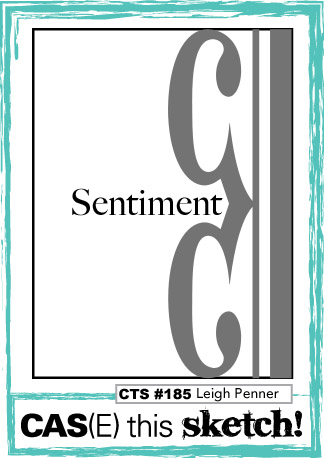
I'm playing along with this week's CAS(E) This Sketch, designed by the talented Leigh Penner, who I always see "spreading love" throughout Blogland (she's so sweet leaving all those comments):
I was inspired by a coffee mug owned by a friend of mine that is a lovely shade of deep teal, with gold feathers all over it, so I pulled out Stampin' Up's Fine Feathers and some gold embossing powder.
My card is a blend of so many wonderful companies out there - Simon Says Stamp provided the sentiment (Love Wafer Die + Sending & Wishing stamp set masked for just the "YOU"), MFT for the lovely Stitched Rectangle Scallop Frame Die-namics, Avery Elle's Happy Hour for the wee dot clusters, PTI for the Hawaiian Shores cardstock, and Stampin' Up's Fine Feathers for that lovely feather image. The framed centre panel has been popped up for some added interest.
I loved the design so much that I actually put together several cards with that teal/gold combo, which suited both birthday cards as well as sympathy cards that I worked on over the weekend. Sadly, I haven't had much time to spend in my craft room as work has kept me both busy and exhausted by the time I come home. But it did feel good to get inky this weekend and join along with CAS(E) This Sketch again - the DT cards, as well as so many lovely entries for this week's challenge, were great inspiration for me.
Sunday, February 26, 2017
Monday, February 13, 2017
Prayers Garden Hydrangea - FMS #274
Happy Monday -
Well, February is proving to be quite the snowy month for many of us, and yesterday we got a wallop of the white stuff! It started in the morning, and didn't stop until later in the evening.
When all was said and done, the "official" reported amount was around 17 cms (just over 1/2 foot) for my area, just north of Toronto (Canada), but I'd like it if "they" came out with a ruler to measure the ACTUAL amount, which was well over a foot! My sore back & arms can prove it, too :-)
A great day to stay indoors to craft, wouldn't you say?
This week's sketch by Jen B. over at Freshly Made Sketches provided the inspiration for a card I wanted to make for an amazing couple, parents to a son I grew up with, who are going through some difficult times with the husband being diagnosed with Pancreatic Cancer.
I also recently received some goodies from Altenew's latest release, so decided to use the Garden Hydrangea set for my card:
Hero Arts Stamp & Cuts "Prayers" Coordinating Set provided the right words.
The flower and "prayers" diecuts are popped up for dimension, and I rounded the outside corners to soften the look a bit.
Hope, when they receive it, they feel my heartfelt "hug".
Thanks for dropping in!
Well, February is proving to be quite the snowy month for many of us, and yesterday we got a wallop of the white stuff! It started in the morning, and didn't stop until later in the evening.
When all was said and done, the "official" reported amount was around 17 cms (just over 1/2 foot) for my area, just north of Toronto (Canada), but I'd like it if "they" came out with a ruler to measure the ACTUAL amount, which was well over a foot! My sore back & arms can prove it, too :-)
A great day to stay indoors to craft, wouldn't you say?
This week's sketch by Jen B. over at Freshly Made Sketches provided the inspiration for a card I wanted to make for an amazing couple, parents to a son I grew up with, who are going through some difficult times with the husband being diagnosed with Pancreatic Cancer.
I also recently received some goodies from Altenew's latest release, so decided to use the Garden Hydrangea set for my card:
Hero Arts Stamp & Cuts "Prayers" Coordinating Set provided the right words.
The flower and "prayers" diecuts are popped up for dimension, and I rounded the outside corners to soften the look a bit.
Hope, when they receive it, they feel my heartfelt "hug".
Thanks for dropping in!
Monday, February 6, 2017
The Flower Challenge #5 - CASEing Therese Calvird (Guest DT)
For those who know me, you know how much I LOVE flowers - of any kind !
So it's no surprise that this new Challenge Blog caught my eye when it was launched a short time ago - The Flower Challenge
One thing that appeals to me is the length of time one is allowed to play along - a WHOLE MONTH! With my busy schedule, we are the perfect match.
I'm happy to say that I finally got around to joining the fun after seeing the amazing inspiration card created by the talented Therese Calvird, who is this month's Guest Design Team Member:
Isn't this card simply divine? I love how elegant she makes this CAS card design!
I CASE'd her sweet LO, as well as adding colour to the negative space left by a floral diecut and how she added the sentiment to come up with this:
I used Altenew's Peony Bouquet, and stamped the flower image in the negative space left by the matching die. The greenery was stamped on the top panel. My Misti made it all come together in a pinch (ummm .... OK, maybe a few pinches LOL). Simon Says Stamp's Wishing Sentiments and die from their "Together Forever" release supplied the lovely Birthday sentiment.
I urge you to go check out not only the fabulous cards that the DT has to inspire us, but also the wonderful challenge entries (linked here). Talent definitely abounds! In fact, I may be tempted to give this challenge another try :-)
So sweet of you to pop in for a wee visit today! Hope to see you again soon.
Cheers!
So it's no surprise that this new Challenge Blog caught my eye when it was launched a short time ago - The Flower Challenge
One thing that appeals to me is the length of time one is allowed to play along - a WHOLE MONTH! With my busy schedule, we are the perfect match.
I'm happy to say that I finally got around to joining the fun after seeing the amazing inspiration card created by the talented Therese Calvird, who is this month's Guest Design Team Member:
Isn't this card simply divine? I love how elegant she makes this CAS card design!
I CASE'd her sweet LO, as well as adding colour to the negative space left by a floral diecut and how she added the sentiment to come up with this:
I used Altenew's Peony Bouquet, and stamped the flower image in the negative space left by the matching die. The greenery was stamped on the top panel. My Misti made it all come together in a pinch (ummm .... OK, maybe a few pinches LOL). Simon Says Stamp's Wishing Sentiments and die from their "Together Forever" release supplied the lovely Birthday sentiment.
I urge you to go check out not only the fabulous cards that the DT has to inspire us, but also the wonderful challenge entries (linked here). Talent definitely abounds! In fact, I may be tempted to give this challenge another try :-)
So sweet of you to pop in for a wee visit today! Hope to see you again soon.
Cheers!
Monday, January 30, 2017
Altenew January 2017 Inspiration Challenge - Hello
Hello & welcome -
It seems that Mother Nature has decided she would spring Winter back on us this week, after almost 2 weeks of unseasonably warm temperatures that saw most of our previous snowfall melt and disappear.
I'm not sure which weather I prefer, as the warmer temps brought mucky conditions in our local park. I cringed while walking our dogs as this would inevitably mean I'd be washing my floors several times each day. Yes, the pleasures of owning 4-legged furry friends never ends! In my case, 2 long-haired Irish Setters (read into that: more space for dirt to hide and eventually fall off in the house LOL).
I'm so happy you've paid my little blog a visit today as I have another card I worked on over the weekend, this one using my Zig Kuretake Gansai Tambi watercolour set. This card's inspiration comes from Altenew's January 2017 challenge, as seen here:
I must admit that I don't use yellows much - I tend to sway towards blues & greens more often - but I like how these colours go so well together. You need only check out the amazing gallery on the Altenew site to see what I mean. So many amazing cards.
This is only the second card on which I've tried watercolouring (if I don't count my throw-aways!). It'll definitely be a large learning curve for me, but I do enjoy it, so I'll keep practicing.
I added some gold and black ink spots on the watercoloured grey BG once everything had dried. I cut out the image with my Stitched Rectangle dies and mounted it on gold cardstock along with a grey Pretty Pink Posh Scallop Frame diecut. The image panel is popped up for dimension.
Hope your day is a crafty one!
Supplies: Altenew Best Mom & Flower Frame stamp sets
It seems that Mother Nature has decided she would spring Winter back on us this week, after almost 2 weeks of unseasonably warm temperatures that saw most of our previous snowfall melt and disappear.
I'm not sure which weather I prefer, as the warmer temps brought mucky conditions in our local park. I cringed while walking our dogs as this would inevitably mean I'd be washing my floors several times each day. Yes, the pleasures of owning 4-legged furry friends never ends! In my case, 2 long-haired Irish Setters (read into that: more space for dirt to hide and eventually fall off in the house LOL).
I'm so happy you've paid my little blog a visit today as I have another card I worked on over the weekend, this one using my Zig Kuretake Gansai Tambi watercolour set. This card's inspiration comes from Altenew's January 2017 challenge, as seen here:
I must admit that I don't use yellows much - I tend to sway towards blues & greens more often - but I like how these colours go so well together. You need only check out the amazing gallery on the Altenew site to see what I mean. So many amazing cards.
This is only the second card on which I've tried watercolouring (if I don't count my throw-aways!). It'll definitely be a large learning curve for me, but I do enjoy it, so I'll keep practicing.
I added some gold and black ink spots on the watercoloured grey BG once everything had dried. I cut out the image with my Stitched Rectangle dies and mounted it on gold cardstock along with a grey Pretty Pink Posh Scallop Frame diecut. The image panel is popped up for dimension.
Hope your day is a crafty one!
Supplies: Altenew Best Mom & Flower Frame stamp sets
Sunday, January 29, 2017
I'm Owl Yours - CAS(E) This Sketch #206
Hello, my crafty friends!
I'm finding it quite the struggle to get inky lately, although I do make sure to visit crafty blogs to leave some love and be inspired by all the wonderful creations out there.
I have a lot happening in my life lately, most notably the closing of the business for which I've worked full time for over 30 years. May 31st spells the end of a business which originally began in 1941 - yes, you read that right, 1941. Sad, sad news and I have very mixed feelings over the situation. But of course, that means I may have more time to be creative with all the free time I'll have on my hands (unless a new job falls in my lap LOL). Keeping my fingers crossed and excited to see what the future brings.
Enough of all that chatter! On to my card, and the wonderful inspiration I received from this week's CAS(E) This Sketch challenge by the talented Leigh Penner, and all the amazing entries:
Having recently purchased My Favorite Things' I'm Owl Yours stamp/die set, this is what I reached for when coming up with my card design. It doesn't get any simpler than that.
Appreciate the visit today and hope to see you again soon!
Supplies: MFT I'm Owl Yours stamp & Die-namics; PTI Cloud 1 & 2 dies; Spellbinders Cherry Blossom dies; PTI The Sweet Life stamp set
I'm finding it quite the struggle to get inky lately, although I do make sure to visit crafty blogs to leave some love and be inspired by all the wonderful creations out there.
I have a lot happening in my life lately, most notably the closing of the business for which I've worked full time for over 30 years. May 31st spells the end of a business which originally began in 1941 - yes, you read that right, 1941. Sad, sad news and I have very mixed feelings over the situation. But of course, that means I may have more time to be creative with all the free time I'll have on my hands (unless a new job falls in my lap LOL). Keeping my fingers crossed and excited to see what the future brings.
Enough of all that chatter! On to my card, and the wonderful inspiration I received from this week's CAS(E) This Sketch challenge by the talented Leigh Penner, and all the amazing entries:
Having recently purchased My Favorite Things' I'm Owl Yours stamp/die set, this is what I reached for when coming up with my card design. It doesn't get any simpler than that.
Appreciate the visit today and hope to see you again soon!
Supplies: MFT I'm Owl Yours stamp & Die-namics; PTI Cloud 1 & 2 dies; Spellbinders Cherry Blossom dies; PTI The Sweet Life stamp set
Wednesday, October 5, 2016
Copper Layering Leaves Birthday
Hello, and thank you for popping in -
I know it has been a while!
My computer was in a repair shop for about a month, which made posting impossible (and in some cases, commenting on all the lovely blogs I follow, for which I apologize!). There's only a limited amount of stuff I can do on my work computer during the day ;-)
So without further delay, I wanted to post one of the many cards I've made using the very lovely Concord & 9th Layering Leaves die set, which I couldn't wait to get my hands on as soon as it was released.
I picked up the new Copper Foil sheets recently released in the Stampin' Up Holiday Mini catalogue. Can you say "G O R G E O U S" ??? Unfortunately, you'll just have to imagine that rich, coppery colour as my photography skills definitely do NOT do this card justice!
I didn't expect this card to take on such a masculine "feel" to it, but I'm happy with how it turned out.
Sending this over to a couple of challenges that it fits in with -
Muse Challenge #186, where Anita's beautiful card inspired me to use 3 leaf dies and a Birthday theme
and Pinterest Inspired Lawnscaping Challenge (sponsored by Ellen Hutson):
With those gorgeous, coppery orange colours & all those lovely leaf images, it's not hard to see where I got the inspiration for my card :-)
Thanks for your visit - have a crafty day!
I know it has been a while!
My computer was in a repair shop for about a month, which made posting impossible (and in some cases, commenting on all the lovely blogs I follow, for which I apologize!). There's only a limited amount of stuff I can do on my work computer during the day ;-)
So without further delay, I wanted to post one of the many cards I've made using the very lovely Concord & 9th Layering Leaves die set, which I couldn't wait to get my hands on as soon as it was released.
I picked up the new Copper Foil sheets recently released in the Stampin' Up Holiday Mini catalogue. Can you say "G O R G E O U S" ??? Unfortunately, you'll just have to imagine that rich, coppery colour as my photography skills definitely do NOT do this card justice!
I didn't expect this card to take on such a masculine "feel" to it, but I'm happy with how it turned out.
Sending this over to a couple of challenges that it fits in with -
Muse Challenge #186, where Anita's beautiful card inspired me to use 3 leaf dies and a Birthday theme
and Pinterest Inspired Lawnscaping Challenge (sponsored by Ellen Hutson):
With those gorgeous, coppery orange colours & all those lovely leaf images, it's not hard to see where I got the inspiration for my card :-)
Thanks for your visit - have a crafty day!
Sunday, August 21, 2016
Painted Flowers "Thanks" - Freshly Made Sketches #250
This is my second post today, so if you stopped in to have a peek at my CAS(E) This Sketch card, click on this link.
I happened to have a bit more time to play today so decided to give this week's sketch by Cecile over at Freshly Made Sketches a try.
Since I was also inspired by this month's challenge over at Altenew that featured this lovely photo/colour combo, I took out one of my favourite floral stamp sets - Altenew's Painted Flowers - for my card.
.
Some lovely DP by Echo Park (Be Mine Collection) completes the look -
With such amazing inspiration as that, my card was quick & easy.
If you have a bit of time, why not check out the lovely posts on these two fabulous challenge blogs - you're sure to be inspired by all the amazing talent.
Cheers!
I happened to have a bit more time to play today so decided to give this week's sketch by Cecile over at Freshly Made Sketches a try.
Since I was also inspired by this month's challenge over at Altenew that featured this lovely photo/colour combo, I took out one of my favourite floral stamp sets - Altenew's Painted Flowers - for my card.
.
Some lovely DP by Echo Park (Be Mine Collection) completes the look -
With such amazing inspiration as that, my card was quick & easy.
If you have a bit of time, why not check out the lovely posts on these two fabulous challenge blogs - you're sure to be inspired by all the amazing talent.
Cheers!
Welcome Baby - CAS(E) This Sketch #186
I had so much fun playing over at CAS(E) This Sketch last week, I just had to do it again!
As soon as I saw this week's sketch, my mind started going in different directions - literally! Those arrow images made me immediately think of flight for some strange reason. Hey, when Mr. Mojo drops in unexpectedly after being away for a while, you just have to go with it if you ask me LOL
Here's the sketch, designed by the talented N@ Ali:
and here's my take on the sketch -
It seems I may have to hang onto this card for a while longer as most babies being born around me tend to be darling little girls. But at least I'm ready when a handsome baby boy comes along!
Happy, crafty weekend & thanks for joining me again today.
As soon as I saw this week's sketch, my mind started going in different directions - literally! Those arrow images made me immediately think of flight for some strange reason. Hey, when Mr. Mojo drops in unexpectedly after being away for a while, you just have to go with it if you ask me LOL
Here's the sketch, designed by the talented N@ Ali:
and here's my take on the sketch -
It seems I may have to hang onto this card for a while longer as most babies being born around me tend to be darling little girls. But at least I'm ready when a handsome baby boy comes along!
Happy, crafty weekend & thanks for joining me again today.
Sunday, August 14, 2016
Without a Little Rain - CAS(E) This Sketch #185 & colourQ challenge #354
This is my second post today - squeal!!! I can't believe it either.
A rainy weekend definitely worked miracles - both for my garden, as well as my (missing) mojo :-)
I'm again combining 2 great challenges with my card: CAS(E) This Sketch #185 and colourQ #354
And as you can see by my card, I was definitely influenced by our rainy weather ;-)
Thank you again for your lovely visit! Links are provided above for you to check out the creative galleries for each challenge if you need inspiration to join in.
Until the next time, take care!
A rainy weekend definitely worked miracles - both for my garden, as well as my (missing) mojo :-)
I'm again combining 2 great challenges with my card: CAS(E) This Sketch #185 and colourQ #354
And as you can see by my card, I was definitely influenced by our rainy weather ;-)
Thank you again for your lovely visit! Links are provided above for you to check out the creative galleries for each challenge if you need inspiration to join in.
Until the next time, take care!
Freshly Made Sketches #249 - Bring on the Cake
Yesterday provided the perfect opportunity to stay indoors and play in my craft room - we finally got some much needed rain in our neck of the woods, but it came down hard and fast. I'm thankful for the free watering that my garden enjoyed!
Today's card was inspired by this wonderful sketch over on the Freshly Made Sketches blog
My card uses some lovely Sugar Pea Design stamps & dies that I picked up a while back, after I fell head-over-heels for that funky cake design.
I added some clear embossed star cluster images on my white panel, then scattered some single star images stamped in Rose Red along with a few Pretty Pink Posh iridescent sequins for interest. The top tier of the cake was also stamped with tone-on-tone grey with the same star cluster image. The cake and candle are popped up for dimension.
Here's a picture of a winter-hardy Hibiscus in my front garden - it's a lovely 2-toned pink-hot pink Dinner Plate sized variety that provided some colour inspiration for my card above :-)
Hope you're having a crafty weekend as well & thanks for dropping by.
Today's card was inspired by this wonderful sketch over on the Freshly Made Sketches blog
My card uses some lovely Sugar Pea Design stamps & dies that I picked up a while back, after I fell head-over-heels for that funky cake design.
I added some clear embossed star cluster images on my white panel, then scattered some single star images stamped in Rose Red along with a few Pretty Pink Posh iridescent sequins for interest. The top tier of the cake was also stamped with tone-on-tone grey with the same star cluster image. The cake and candle are popped up for dimension.
Here's a picture of a winter-hardy Hibiscus in my front garden - it's a lovely 2-toned pink-hot pink Dinner Plate sized variety that provided some colour inspiration for my card above :-)
Hope you're having a crafty weekend as well & thanks for dropping by.
Friday, August 12, 2016
The Heart Desires Challenge #3 - Hello Tag Card
Thanks for joining me today!
Just wanted to play along with the new The Heart Desires Challenge #3, with this inspirational photo as a jump start:
What "spoke" to me was the gold accents and purple flowers, as you can see by my card here:
I used a mix of some new crafty purchases with some old for my card. At first I gold embossed the diamond pattern several times on a cream cardstock base (thank you, Misti!), then cut out my tag from it, keeping the base and centre sections, and inlaying the purple scalloped "frame" section. This provided the perfect backdrop for my watering can filled with purple blooms. The tag was finished off with a bit of green string.
The base of my card was created with Papertrey Ink's Noted: Scalloped A2 card base die, then layered with the purple and green cardstock. The green layer was first run through my Cuttlebug with Papertrey Ink's Linen & Canvas Impression plate to give it some subtle texture.
To add a bit more gold accenting, I diecut the lovely "Hello" sentiment in gold mirror cardstock, which matches the gold embossing perfectly.
The tag, the flowers/watering can and sentiment were all adhered with dimensionals
I've been struggling with my lack of mojo for a while, but challenges like this one definitely help. Now if only I could enter every wonderful challenge I always have good intentions of entering more often :-) I may need to quit my day job LOL
Thank you for your visit today - it's been a treat knowing you were here!
Supplies:
Stamps: PTI Background Basics: Retro; PTI Bitty Bouquets
Dies: PTI Noted: A2 Scalloped dies; PTI Tag Sale #10; PTI Bitty Bouquets die set; MFT Spring Garden Die-namics; MFT Hello There Die-namics
Accessories: Gold Embossing Powder; Green String; Dimensionals
Just wanted to play along with the new The Heart Desires Challenge #3, with this inspirational photo as a jump start:
What "spoke" to me was the gold accents and purple flowers, as you can see by my card here:
I used a mix of some new crafty purchases with some old for my card. At first I gold embossed the diamond pattern several times on a cream cardstock base (thank you, Misti!), then cut out my tag from it, keeping the base and centre sections, and inlaying the purple scalloped "frame" section. This provided the perfect backdrop for my watering can filled with purple blooms. The tag was finished off with a bit of green string.
The base of my card was created with Papertrey Ink's Noted: Scalloped A2 card base die, then layered with the purple and green cardstock. The green layer was first run through my Cuttlebug with Papertrey Ink's Linen & Canvas Impression plate to give it some subtle texture.
To add a bit more gold accenting, I diecut the lovely "Hello" sentiment in gold mirror cardstock, which matches the gold embossing perfectly.
The tag, the flowers/watering can and sentiment were all adhered with dimensionals
I've been struggling with my lack of mojo for a while, but challenges like this one definitely help. Now if only I could enter every wonderful challenge I always have good intentions of entering more often :-) I may need to quit my day job LOL
Thank you for your visit today - it's been a treat knowing you were here!
Supplies:
Stamps: PTI Background Basics: Retro; PTI Bitty Bouquets
Dies: PTI Noted: A2 Scalloped dies; PTI Tag Sale #10; PTI Bitty Bouquets die set; MFT Spring Garden Die-namics; MFT Hello There Die-namics
Accessories: Gold Embossing Powder; Green String; Dimensionals
Wednesday, August 10, 2016
Life is Better with Friends
Today I'm posting one of my favourite types of cards ...
Not Birthday cards (although I do tend to make more of these than any other cards).
A "just because" card. Sent for no other reason than to just say "hello; I'm thinking about you and want to let you know how much I appreciate you".
Nothing makes me smile more than when I receive them, or send them. We always expect to receive lovely creations from our cardmaking pals on our special days (Birthdays, Anniversaries, etc.), but those that arrive out of the blue are truly Happy Mail, aren't they?
I have been itching to use this stamp set that I ordered from Close To My Heart, but wanted to use it along with the Tropical Leaves set from Simon Says Stamp. Unfortunately I didn't order the SSS set as soon as it was released, but my order is in and I'm waiting for it to be back in stock soon.
So I had to search my stamp stash to see if I could find another set with leafy greenery that would work and settled on a PTI set.
I think it turned out just fine!
I love how this CTMH set has 2 Flamingo images that face each other. And it also allows you to stamp the beak, body, legs, and wings separately. The sweet sentiment is also from this set. So adorable!
The wing diecut on the left was brushed with Wink of Stella clear glitter while the wing diecut on the right was accented with stickles to add a bit of bling to my card.
This was a fun card to put together!
Thanks for dropping in - have yourself an amazing day.
Supplies:
Stamps: Close to My Heart Tickled Pink; Papertrey Ink Willow; Papertrey Ink Sand Swatch
Dies: Close to My Heart Tickled Pink Thin Cuts; Simon Says Stamp Stitched Rectangle Die Set
Ink: Simon Says Stamp Teeny Bikini; Stampin' Up Sahara Sand + Garden Green; Distress Broken China Ink
Not Birthday cards (although I do tend to make more of these than any other cards).
A "just because" card. Sent for no other reason than to just say "hello; I'm thinking about you and want to let you know how much I appreciate you".
Nothing makes me smile more than when I receive them, or send them. We always expect to receive lovely creations from our cardmaking pals on our special days (Birthdays, Anniversaries, etc.), but those that arrive out of the blue are truly Happy Mail, aren't they?
I have been itching to use this stamp set that I ordered from Close To My Heart, but wanted to use it along with the Tropical Leaves set from Simon Says Stamp. Unfortunately I didn't order the SSS set as soon as it was released, but my order is in and I'm waiting for it to be back in stock soon.
So I had to search my stamp stash to see if I could find another set with leafy greenery that would work and settled on a PTI set.
I think it turned out just fine!
I love how this CTMH set has 2 Flamingo images that face each other. And it also allows you to stamp the beak, body, legs, and wings separately. The sweet sentiment is also from this set. So adorable!
The wing diecut on the left was brushed with Wink of Stella clear glitter while the wing diecut on the right was accented with stickles to add a bit of bling to my card.
This was a fun card to put together!
Thanks for dropping in - have yourself an amazing day.
Supplies:
Stamps: Close to My Heart Tickled Pink; Papertrey Ink Willow; Papertrey Ink Sand Swatch
Dies: Close to My Heart Tickled Pink Thin Cuts; Simon Says Stamp Stitched Rectangle Die Set
Ink: Simon Says Stamp Teeny Bikini; Stampin' Up Sahara Sand + Garden Green; Distress Broken China Ink
Friday, August 5, 2016
Summer Lovin' - Time Out Challenge #63
This week's Time Out challenge seemed to "speak" to me :-)
When I saw what the challenge's theme was, and with our unusually hot temps and the fact that I've been on holidays, this card basically made itself! All I had to do was glue it together.
OK, maybe I had to do a bit more, but not much!
So, here's the challenge:
'Holidays with the Optional Twist of No Stamping' (stamped sentiments allowed)
Obviously I went with the "Summer Holidays" theme, and this is what I came up with:
Flip Flops and a Summer Hat ... does it get any better than that??? Not in my books.
Pop on over to see the other lovely cards entered in the challenge (use the link above) and play along!
Supplies:
dies: Papertrey Ink Flipping Out; Joy Crafts Summer Hat; My Favorite Things Inside & Out Rounded Rectangle STAX Die-namics
Stamps: Papertrey Ink Sand Swatch; Joy Crafts Summer Lovin'
When I saw what the challenge's theme was, and with our unusually hot temps and the fact that I've been on holidays, this card basically made itself! All I had to do was glue it together.
OK, maybe I had to do a bit more, but not much!
So, here's the challenge:
'Holidays with the Optional Twist of No Stamping' (stamped sentiments allowed)
Obviously I went with the "Summer Holidays" theme, and this is what I came up with:
Flip Flops and a Summer Hat ... does it get any better than that??? Not in my books.
Pop on over to see the other lovely cards entered in the challenge (use the link above) and play along!
Supplies:
dies: Papertrey Ink Flipping Out; Joy Crafts Summer Hat; My Favorite Things Inside & Out Rounded Rectangle STAX Die-namics
Stamps: Papertrey Ink Sand Swatch; Joy Crafts Summer Lovin'
CAS(E) This Sketch #183 meets colourQ #353 - You Color My World
Phew!
It's been so darn hot and dry lately, and it looks like there's no end in sight for the next little while too. I've actually been on holidays so this wonderful weather has been both a blessing and a curse. Too hot to spend a lot of time outdoors, but trying to spend as much time outside enjoying it as I can too.
As I've been in a bit of a card funk lately, the heat has managed to force me indoors to spend more time in my craft room, so that has been fun.
I found some inspiration in several challenge blogs this week, and one of them was this easy-peasy sketch on the CAS(E) This Sketch blog, which I paired with the fabulous colour combination in this week's colourQ #353:
Doesn't that sketch just get the mind going in all sorts of directions??? And those colours? What a fab combination!
Well, all you have to do is check out what the amazing DTs have done with these challenges to help you play along, as I did, and came up with this card:
Hoping that you're enjoying the weather in your neck of the woods! Thanks for dropping by.
Supplies:
Dies: Taylored Expressions Little Bits: Crayon; Simon Says Stamp Stitched Rectangle Die Set
Stamps: Papertrey Ink Happy Trails
It's been so darn hot and dry lately, and it looks like there's no end in sight for the next little while too. I've actually been on holidays so this wonderful weather has been both a blessing and a curse. Too hot to spend a lot of time outdoors, but trying to spend as much time outside enjoying it as I can too.
As I've been in a bit of a card funk lately, the heat has managed to force me indoors to spend more time in my craft room, so that has been fun.
I found some inspiration in several challenge blogs this week, and one of them was this easy-peasy sketch on the CAS(E) This Sketch blog, which I paired with the fabulous colour combination in this week's colourQ #353:
Doesn't that sketch just get the mind going in all sorts of directions??? And those colours? What a fab combination!
Well, all you have to do is check out what the amazing DTs have done with these challenges to help you play along, as I did, and came up with this card:
Hoping that you're enjoying the weather in your neck of the woods! Thanks for dropping by.
Supplies:
Dies: Taylored Expressions Little Bits: Crayon; Simon Says Stamp Stitched Rectangle Die Set
Stamps: Papertrey Ink Happy Trails
Monday, July 25, 2016
Papertrey Ink SAF 2016 - Gilded in Gold with Danielle Flanders
Happy Monday!
Stamp-a-Faire continues with yet another wonderful tutorial (catch it here) by Danielle Flanders that encourages us to use gold on our projects, and in particular, Liquid Leaf Gold, which unfortunately I didn't have available.
So I substituted a product called Inka Gold by Viva Decor, which works in the same way. Inka Gold is a waxy product that you rub onto your paper die cuts. Once dry (it dries very quickly), you rub the surface with a soft paper cloth/tissue, which brings out its luxurious shine. However, I actually added a bit of water to the "pot" and mixed the medium with a paintbrush until I achieved the right consistency to paint it onto my die cut in order to get the "brushed" affect.
I started with a piece of black cardstock, which I diecut with my Splits: Celebrate die. Love how the brushstrokes didn't completely cover the cardstock and allowed the black to come through in some areas.
Once dried, I shined it up and added the "celebrate" diecut to the centre and adhered it with dimensionals to my black cardstock, which I cut with a stitched rectangle die and mounted it on a panel of shiny gold cardstock, then again on a final panel of black. Of course, I had to add gold ink spots to my top black panel too!
A white cardstock strip was also painted with the Inka Gold for the remainder of my sentiment, but this time I used black embossing powder. A quick trim, a few adhesive dots placed behind, and the panel was added to the base of my card. The last finishing touch was the addition of a few sparkly gold sequins and my card was a 'fait accompli' :-)
Thanks for joining me today - hope you get time to join in the SAF fun!
Supplies:
Stamps & Dies: PTI Wet Paint Cuts III
Stamp-a-Faire continues with yet another wonderful tutorial (catch it here) by Danielle Flanders that encourages us to use gold on our projects, and in particular, Liquid Leaf Gold, which unfortunately I didn't have available.
So I substituted a product called Inka Gold by Viva Decor, which works in the same way. Inka Gold is a waxy product that you rub onto your paper die cuts. Once dry (it dries very quickly), you rub the surface with a soft paper cloth/tissue, which brings out its luxurious shine. However, I actually added a bit of water to the "pot" and mixed the medium with a paintbrush until I achieved the right consistency to paint it onto my die cut in order to get the "brushed" affect.
I started with a piece of black cardstock, which I diecut with my Splits: Celebrate die. Love how the brushstrokes didn't completely cover the cardstock and allowed the black to come through in some areas.
Once dried, I shined it up and added the "celebrate" diecut to the centre and adhered it with dimensionals to my black cardstock, which I cut with a stitched rectangle die and mounted it on a panel of shiny gold cardstock, then again on a final panel of black. Of course, I had to add gold ink spots to my top black panel too!
A white cardstock strip was also painted with the Inka Gold for the remainder of my sentiment, but this time I used black embossing powder. A quick trim, a few adhesive dots placed behind, and the panel was added to the base of my card. The last finishing touch was the addition of a few sparkly gold sequins and my card was a 'fait accompli' :-)
Thanks for joining me today - hope you get time to join in the SAF fun!
Supplies:
Stamps & Dies: PTI Wet Paint Cuts III
Sunday, July 24, 2016
Papertrey Ink - 2016 SAF, Starry Night Sky Technique with Amy Sheffer
The start of Papertrey Ink's 2016 edition of Stamp-a-Faire is finally here!
They have an amazing line-up of tutorials, and one in particular I've been very much looking forward to is Amy Sheffer's Night Sky Tutorial.
Of course, I wasn't quite sure I could pull off this awesome technique once I saw Amy's feature card, but watching her easy-to-follow video was not only inspiring, but shows just how easy this technique is.
Check out this wonderful video here to see for yourself.
Oh sure, I may not have the perfect result this time around, but I found this technique so forgiving that I'm sure that each time I attempt it, my card will end up with a different look. But that's the beauty of a night sky, isn't it? It looks different all the time.
My card has a scattering of Pretty Pink Posh Iridescent Mini Star Sequins as well as ink splatters in silver that add some lovely sparkle to it (you may not be able to see that in the photo).
A big "Thank You" to Amy, as well as the Papertrey Ink DT, for sharing their wonderful knowledge and proving yet again how amazingly generous the stamping community is.
I will definitely use this technique again and again!
Supplies:
Stamps: PTI Through the Trees
Dies: PTI Wet Paint Cuts III
They have an amazing line-up of tutorials, and one in particular I've been very much looking forward to is Amy Sheffer's Night Sky Tutorial.
Of course, I wasn't quite sure I could pull off this awesome technique once I saw Amy's feature card, but watching her easy-to-follow video was not only inspiring, but shows just how easy this technique is.
Check out this wonderful video here to see for yourself.
Oh sure, I may not have the perfect result this time around, but I found this technique so forgiving that I'm sure that each time I attempt it, my card will end up with a different look. But that's the beauty of a night sky, isn't it? It looks different all the time.
My card has a scattering of Pretty Pink Posh Iridescent Mini Star Sequins as well as ink splatters in silver that add some lovely sparkle to it (you may not be able to see that in the photo).
A big "Thank You" to Amy, as well as the Papertrey Ink DT, for sharing their wonderful knowledge and proving yet again how amazingly generous the stamping community is.
I will definitely use this technique again and again!
Supplies:
Stamps: PTI Through the Trees
Dies: PTI Wet Paint Cuts III
Sunday, June 19, 2016
Giraffe Birthday Wishes - colourQ challenge #346
Wow ... I'm motoring gliding along with cards, aren't I?
May as well strike while the mojo "iron" is hot! :-) (did you see that segue coming? LOL)
This week's colourQ challenge was a great opportunity for me to add some boy birthday cards to my collection:
Great colours, aren't they? So many ways to go with this ... and so much inspiration to check out on the challenge blog. Here's mine:
I guess I'm on an Avery Elle kick lately as this giraffe balloon image is from one of their sets, and I've paired it with the "Birthday Wishes" sentiment again. I guess you can say, "a match made in card heaven".
Hmmm ... I better quit while I'm ahead. I seem to be in a cliche kinda mood today. Happy Sunday!
Supplies:
Stamps: Avery Elle Balloon Giraffe; Simon Says Stamp Birthday Messages
Inks: See Above
Dies: MFT Stitched Rectangle Scallop Frame Die-namics; Simon Says Stamp Stitched Rectangle die set
Accessories: Dimensional foam dots
May as well strike while the mojo "iron" is hot! :-) (did you see that segue coming? LOL)
This week's colourQ challenge was a great opportunity for me to add some boy birthday cards to my collection:
Great colours, aren't they? So many ways to go with this ... and so much inspiration to check out on the challenge blog. Here's mine:
I guess I'm on an Avery Elle kick lately as this giraffe balloon image is from one of their sets, and I've paired it with the "Birthday Wishes" sentiment again. I guess you can say, "a match made in card heaven".
Hmmm ... I better quit while I'm ahead. I seem to be in a cliche kinda mood today. Happy Sunday!
Supplies:
Stamps: Avery Elle Balloon Giraffe; Simon Says Stamp Birthday Messages
Inks: See Above
Dies: MFT Stitched Rectangle Scallop Frame Die-namics; Simon Says Stamp Stitched Rectangle die set
Accessories: Dimensional foam dots
Saturday, June 18, 2016
Ellie's Birthday Wishes - CAS(E) this Sketch #177 + Time Out Challenge #59
Combining 2 challenges with my card today -
CAS(E) This Sketch #177, which I flipped
as well as this week's Time Out Challenge #59, which is "Masculine with a optional twist of mixed media".
Fun, right?
And today happens to be my DH's birthday :-)
I asked his opinion on my last card post, and sure it had "MASCULINE" written all over it (not to mention my love for him). But, he has already seen it ... so what surprise is there in that???
So I had to get hopping today while he was at work as we're celebrating his special day tonight, and this is the card I came up with:
Avery Elle's adorable Ellie is helping me wish him a very Happy Birthday.
I broke out my Primsacolor Watercolor Pencils for this special occasion - it's been AGES since I've coloured an image with them, but this little darling made it quick & easy. A bit of DP for the heart balloon and a sponged sky helped me with my "scene", and of course, for those who know me, you know how much I love my flowers, so I added some Flower Soft to the tops of my grass image to create my wildflower "garden" (is this considered a "mixed media" product? I think so).
Thanks for joining me today - I'm off to finish up the "pièce de résistance" ... birthday cake, of course! :-)
CAS(E) This Sketch #177, which I flipped
as well as this week's Time Out Challenge #59, which is "Masculine with a optional twist of mixed media".
Fun, right?
And today happens to be my DH's birthday :-)
I asked his opinion on my last card post, and sure it had "MASCULINE" written all over it (not to mention my love for him). But, he has already seen it ... so what surprise is there in that???
So I had to get hopping today while he was at work as we're celebrating his special day tonight, and this is the card I came up with:
Avery Elle's adorable Ellie is helping me wish him a very Happy Birthday.
I broke out my Primsacolor Watercolor Pencils for this special occasion - it's been AGES since I've coloured an image with them, but this little darling made it quick & easy. A bit of DP for the heart balloon and a sponged sky helped me with my "scene", and of course, for those who know me, you know how much I love my flowers, so I added some Flower Soft to the tops of my grass image to create my wildflower "garden" (is this considered a "mixed media" product? I think so).
Thanks for joining me today - I'm off to finish up the "pièce de résistance" ... birthday cake, of course! :-)
Wednesday, June 15, 2016
Wild For You - CASology Week #202 + Simon Says Stamp Wednesday Challenge (Animal Magic)
This week's challenge over at CASology is rather simple ... Masculine!
If you're a bit like me, your inside voice just said "yeah, right!". Masculine cards are definitely a challenge for me!
But that didn't stop me from wanting to play along this week, so as soon as I got home I rummaged through my stamp collection and immediately focused on this Deep Red image. Well, that's fine & dandy, but then I had to go on another search & destroy mission to find an appropriate sentiment (you should see my craft room now - ha!). This little gem was hidden away in an old bin of stamps I purchased back when I began this little hobby, and my card idea took hold. I also reacquainted myself with some fabulous stamps I own that I've completely forgotten about :-)
A strip of Basic Grey leopard print DP coordinates with the embossing folder I used on the kraft panel to form the base of my card.
I inked up my stamp image with Distress Vintage Photo, then added black ink lightly with a sponge dauber. The image was then cut with a stitched square die and mounted on black cardstock. The sentiment panel was accented top & bottom with a stitch design to give it a bit of interest.
This week's Simon Says Stamp Challenge also fits the bill for this card: Animal Magic. And since my leopard definitely plays nice, I'm going to send him over there to play along with all the other "animal" creations ;-)
This is the perfect card for my DH this weekend as he celebrates both his Birthday as well as Father's Day!
Cheers!
Supplies:
Stamps: Deep Red Leopard; Michael's Dollar stamp sentiment
Dies: Simon Says Stamp Stitched Square Dies; My Favorite Things Basic Stitch Lines Die-namics
If you're a bit like me, your inside voice just said "yeah, right!". Masculine cards are definitely a challenge for me!
But that didn't stop me from wanting to play along this week, so as soon as I got home I rummaged through my stamp collection and immediately focused on this Deep Red image. Well, that's fine & dandy, but then I had to go on another search & destroy mission to find an appropriate sentiment (you should see my craft room now - ha!). This little gem was hidden away in an old bin of stamps I purchased back when I began this little hobby, and my card idea took hold. I also reacquainted myself with some fabulous stamps I own that I've completely forgotten about :-)
A strip of Basic Grey leopard print DP coordinates with the embossing folder I used on the kraft panel to form the base of my card.
I inked up my stamp image with Distress Vintage Photo, then added black ink lightly with a sponge dauber. The image was then cut with a stitched square die and mounted on black cardstock. The sentiment panel was accented top & bottom with a stitch design to give it a bit of interest.
This week's Simon Says Stamp Challenge also fits the bill for this card: Animal Magic. And since my leopard definitely plays nice, I'm going to send him over there to play along with all the other "animal" creations ;-)
This is the perfect card for my DH this weekend as he celebrates both his Birthday as well as Father's Day!
Cheers!
Supplies:
Stamps: Deep Red Leopard; Michael's Dollar stamp sentiment
Dies: Simon Says Stamp Stitched Square Dies; My Favorite Things Basic Stitch Lines Die-namics
Monday, June 13, 2016
Tic-Tac-Toe Challenge #11 - Celebrate!
Thanks for popping in!
Finally managed to join in on the fun over at the Tic-Tac-Toe Challenge blog, as well as put ink to a stamp set that I ADORE considering the flowers are now blooming in my garden in 3 different colours.
Here are the challenge parameters:
I chose one of the diagonal lines - Yellow, Ink Splatters, Scalloped Border - and created this card:
The ink splatters were added once the image was stamped using Inka Gold Beeswax Polish mixed with water. It has a lovely shine that matches the gold cardstock I used for the scalloped border, but it's hard to see in this photo.
Alas, my yellow peony has almost finished showing off it's gorgeous fragrant flowers, so I must settle for trying to recreate its loveliness on paper until it blooms again next year - an impossible task as Mother Nature does it so much better!
Pop on over to see all the amazing creations on the challenge blog - guaranteed you'll be inspired (and maybe decide to join in?) :-)
Supplies:
Stamps: Altenew Peony Bouquet; Altenew Painted Greetings
Dies: MFT Stitched Rectangle Scallop Frame Die-namics; Simon Says Stamp Stitched Rectangles
Accessories: Viva Decor Inka Gold
Finally managed to join in on the fun over at the Tic-Tac-Toe Challenge blog, as well as put ink to a stamp set that I ADORE considering the flowers are now blooming in my garden in 3 different colours.
Here are the challenge parameters:
I chose one of the diagonal lines - Yellow, Ink Splatters, Scalloped Border - and created this card:
The ink splatters were added once the image was stamped using Inka Gold Beeswax Polish mixed with water. It has a lovely shine that matches the gold cardstock I used for the scalloped border, but it's hard to see in this photo.
Alas, my yellow peony has almost finished showing off it's gorgeous fragrant flowers, so I must settle for trying to recreate its loveliness on paper until it blooms again next year - an impossible task as Mother Nature does it so much better!
Pop on over to see all the amazing creations on the challenge blog - guaranteed you'll be inspired (and maybe decide to join in?) :-)
Supplies:
Stamps: Altenew Peony Bouquet; Altenew Painted Greetings
Dies: MFT Stitched Rectangle Scallop Frame Die-namics; Simon Says Stamp Stitched Rectangles
Accessories: Viva Decor Inka Gold
Subscribe to:
Posts (Atom)